
I go to conferences and meetups to show my apps to other people, and at the end of a good conversation I like to hand over an NFC tag with a promo code on it. You tap the tag, the App Store opens with the code already filled in, and you have the app.
The tags were never the problem. The amount was. Every promo code is different, so every tag needs its own link, and I wanted a few hundred of them. Writing them one at a time in the app was not going to work at that scale. This is why I built CSV batch writing into NFC.cool Tools: I make the list on the Mac, export it as a CSV, get the file onto the phone, and then hold one tag after the other to the phone while the app works through the rows. I have written hundreds of tags this way by now.
Here is the whole process, from the spreadsheet to the last tag. It works the same for product links, serial numbers, Wi-Fi credentials or anything else you can put in a spreadsheet cell.
What CSV batch writing actually does
You give the app a CSV file and every row becomes one tag. The app shows you a preview of what will go on each tag, you tap Start Writing, and then you hold one tag after the other to the phone. Every row that was written is removed from the file, so the list on screen is always what is still left. You can stop at any point and continue later, even days later.
If you have never written an NFC tag before, start with my guide to writing NFC tags with your iPhone. This post is about writing a lot of them.
Step 1: Build the spreadsheet on your computer
Open Numbers, Excel or Google Sheets and make the list on your computer. It is much faster than doing anything on the phone, and the spreadsheet can build the links for you.
The simplest layout is one column with one row per tag. Each row is exactly what one tag will contain. A column of product links looks like this:
https://example.com/products/1001
https://example.com/products/1002
https://example.com/products/1003
If your values only differ by a number or an ID, let a formula build the column. Type the first one, fill down, and the list is finished no matter how long it is. If you already have the IDs in a file, open that file in the spreadsheet and add the fixed part in front with a formula.
The app looks at how each value starts and picks the matching record type:
A link (
https://,http://orwww.) becomes a URL record. Tap the tag and the browser opens it.tel:,mailto:,sms:andgeo:become the matching action, so a tag can dial a number, start an email or open a location.WIFI:T:WPA;S:MyNetwork;P:secret;;becomes a Wi-Fi record, the same format a Wi-Fi QR code uses. One catch: that string contains semicolons, so the app will assume your file is semicolon-separated and split it into pieces. Set the delimiter to comma in the app and the row stays in one piece.shortcuts://runs an iOS Shortcut.Anything else is written as plain text.
Keep each value on one line. The file is read line by line, so a contact card that spans several lines would end up on several tags.
Two things to watch:
No header row. The app treats every non-empty line as content. If your first row says “URL”, the first tag will contain the word URL.
Empty rows are fine. They are skipped, and so is whitespace around a value.
When one tag needs several records
Sometimes one tag should carry more than one thing, for example a website, a phone number and an email address per person. Add columns for that. In the app you choose Group by rows, and each row becomes one tag with one record per cell. Group by columns does the opposite and turns each column into a tag, in case you built the sheet the other way around. For a single-column file there is a Rows per tag setting instead, so three rows can go on one tag as three records.
Step 2: Export it as a CSV
A CSV file is a plain text file. One line per row, and the cells in a row are separated by a comma, a semicolon or a tab. If you open one in TextEdit or Notepad you see exactly what the app will see. A sheet with a link and a phone number per person looks like this after the export:
https://example.com/anna,tel:+4915112345678
https://example.com/ben,tel:+4915198765432
Formatting and formulas do not survive the export, only the values do. Here is how you get that file out of Numbers, Excel and Google Sheets.
Numbers on the Mac
Choose File, then Export To, then CSV.
If your document has more than one table, Numbers asks whether to create one file per table or combine them. You want one table in one file.
Leave Include table names unchecked. Otherwise Numbers writes the table name into the file as its own line, and that line would end up on a tag.
Under Advanced Options, leave the text encoding on Unicode (UTF-8).
Click Next, name the file and click Export.
Two things about Numbers: every new table comes with a shaded header row, and whatever you type in there is exported like any other row, so leave it empty or delete it. And Numbers always uses commas. If a value contains a comma, Numbers wraps it in quotes, and the app does not remove those quotes. So keep commas out of the values when you export from Numbers.
Excel on Mac or Windows
Choose File, then Save As (some versions call it Save a Copy).
Pick the format CSV UTF-8 (Comma delimited) (.csv).
Excel saves only the sheet you are looking at and warns that formatting will be lost. Confirm, you do not need the formatting.
Despite the name, Excel does not always use commas. It uses the list separator from your system’s regional settings, and on a German, French, Dutch or most other European systems that is a semicolon, because the comma is already the decimal separator there. You do not need to change anything. NFC.cool detects comma, semicolon and tab automatically. It also means your values may contain commas.
Google Sheets
Choose File, then Download, then Comma Separated Values (.csv).
Only the current sheet is exported, always with commas.
Before you move the file
I open the exported file in a text editor once before it goes to the phone. You want one line per tag, no header line, no quotes around the values and no stray commas inside a comma-separated file. If a value has to contain a comma, export with semicolons from Excel, or use the TSV export in Numbers (tab-separated) and rename the file to end in .csv. On iPhone the file has to end in .csv either way, because that is what the file picker filters on.
Step 3: Get the file onto your phone
Any way that ends in the Files app on iPhone, or in a place the system file picker can reach on Android, works.
AirDrop the file from your Mac to your iPhone and choose Save to Files.
iCloud Drive: save the CSV to iCloud Drive on the Mac and it shows up in the Files app on the phone. Google Drive and Dropbox work the same way, the Files app can browse them too.
Email it to yourself and save the attachment.
Android: Quick Share from a laptop, Google Drive or a USB cable. The app uses the system document picker, so any location it can open is fine.
Step 4: Import it and check the preview
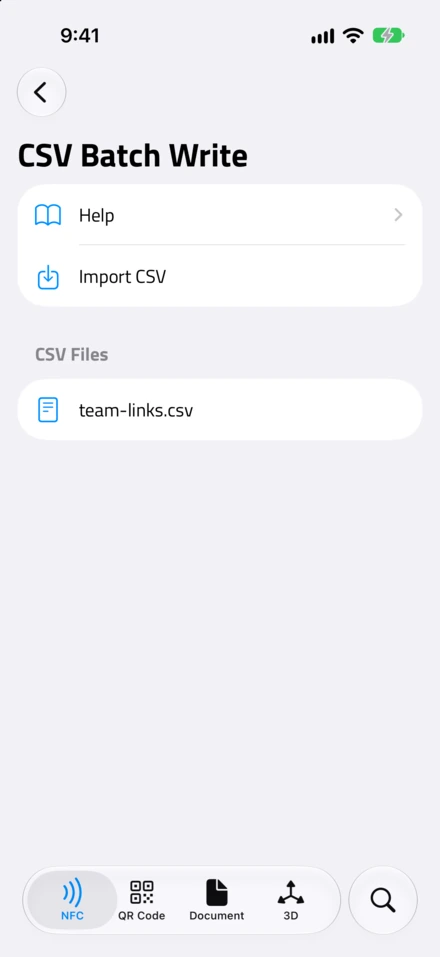
In NFC.cool Tools, open the NFC tools screen and look under Batch Modes for CSV Batch Write. On Android it is in the NFC tools list as well. Tap Import CSV and pick your file.
The app makes its own copy of the file. As you write tags, rows are removed from that copy. Your original spreadsheet on the computer stays as it is, so you always have the full list.
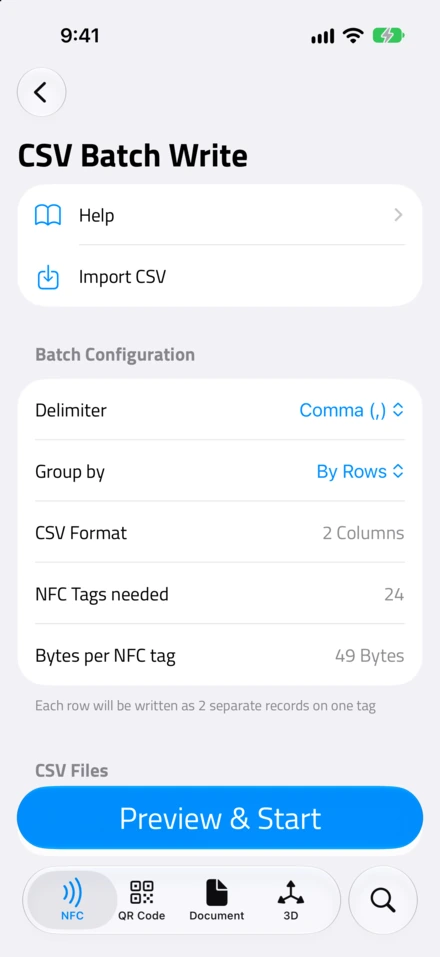
Once the file is selected, the app shows what it detected: the delimiter, the number of columns, the grouping mode and how many tags you will need. The one number I always check is Bytes per NFC tag, the size of the largest message in the batch. Compare it with your tags. An NTAG213 holds 144 bytes, an NTAG215 504 and an NTAG216 888. A short link is around 50 bytes, so the cheapest tags are fine for links. A Wi-Fi record or a longer contact card needs a 215 or 216. If you are not sure which chip you have, have a look at my guide to NFC tag types.
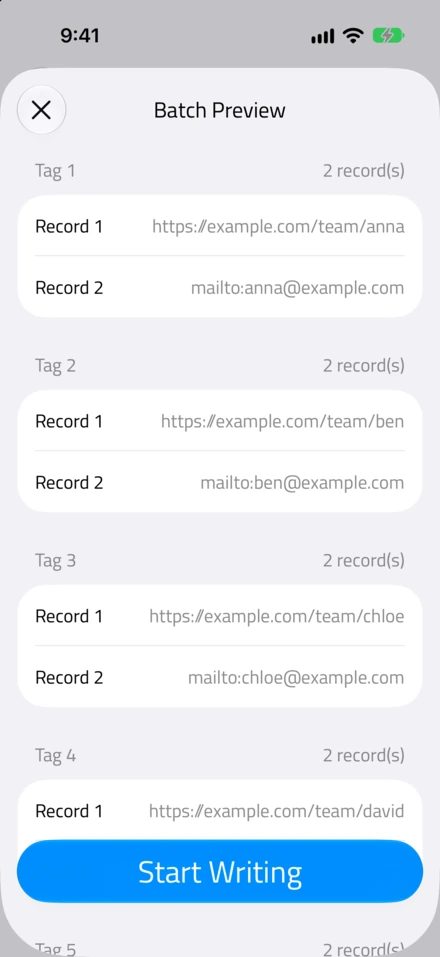
Open Batch Preview to see every tag with the records it will get. What you see there is exactly what gets written.
Step 5: Write the stack
Tap Start Writing and hold the first tag to the top edge of your iPhone. When the phone vibrates, the tag is written and you take the next one. The row you just wrote disappears from the list, and the counter tells you how many are left.
A few things that will happen and are normal:
The scan sheet disappears after 60 seconds. That is an iOS limit, not a crash. It comes back on its own after a few seconds and you continue where you were.
A tag fails. Maybe it was locked, maybe you pulled it away too early. The row stays in the file, the app does not skip ahead, and you hold the tag again or take a different one.
You have to stop. Close the app, do something else, come back tomorrow. The file remembers what is left. On Android the app shows the unfinished batch and offers to resume it.
A hundred tags do not take long once you get going.
What I learned writing hundreds of these
Write two tags first. Then read them back with the app and check that the tag does what it should. Only then write the rest.
You do not need the biggest chip. For links, an NTAG213 is enough and noticeably cheaper in bulk. Keep the NTAG216 for contact cards and Wi-Fi.
Lock or password-protect the tags you give away. Right next to CSV Batch Write there are Batch Lock and Batch Password Protection modes. Lock makes a tag read-only for good, a password lets you change it later but nobody else. For tags that leave your hands, run the stack through one of them afterwards so nobody can overwrite the content.
CSV Batch Write is in NFC.cool Tools on iPhone and Android. And if you meet me at a conference or a meetup, ask me for a tag.